
Garlic will always be a mainstay in our home and kitchen. It’s one of the most important ingredients that should always be part of your pantry. Believe me, this delicious kitchen staple can take your meal to another level.
I mean, who doesn’t love a good old baked scallops with butter and a dash of garlic? Or a simple garlic bread to complement your savory pasta dish?
Garlic just brings out a rich flavor and wonderful aroma from any meal. Is it obvious that I’m a big fan of garlic? Am I being too excited talking about this? Well, I won’t apologize. Aside from being tasty, they have a lot of health benefits too! They’re just that great.
So, of course, I have them in my garden.
For years, I’ve been growing garlic at home. And trust me, you should too. They’re just one of the easiest crops to grow. And so far, I’ve had a pleasant experience growing them myself so I thought I could share some tips with you guys.
FEATURED TABLE
| Botanical Name | Allium sativum |
| Plant Type | Vegetable |
| Sun Exposure | Daily six hours of sun exposure |
| Soil Type | Sandy Loam |
| Soil pH | Acidic |
| Bloom Time | Spring |
| Flower Color | White |
| Hardiness Zones | 3, 4, 5, 6, 7, 8, 9 |
Let me guide you on how to grow garlic from the comfort of your own home. And if you’re new to this, don’t worry! This is a very beginner-friendly plant to grow. Just join in and I’ll be there every step of the way.
Let’s start digging!
Growing Your Own Garlic
There’s one thing you should know before starting this little plant project.
Growing garlic plants are super easy! So just relax. You’re gonna have a great time growing garlic on your own. Oh, and did I mention this plant requires very little attention? Compared to other vegetables, garlic plants are low-maintenance.
It’s a quick and simple plant to grow—perfect for any budding gardeners out there. I can even safely say that the difficulty level for this one is easy.
And it will even be easier with the right tools and information.
Look, all you need is some proper soil and a place with decent moisture and sunlight and you’re good to go! I’ll handle the rest, so just continue reading.
Today you will learn how to grow garlic on your own. And with proper cultivation, I guarantee that you’ll harvest some good home-grown garlic in the end.
How to Grow Garlic: Step-By-Step
Seeds or cloves?
For starters, we need to get some cloves of garlic. You might be tempted to use the garlic you bought from the supermarket, but most of those were previously grown in hot climates.
If you are not located in a hot climate, please do not use those. Instead, get some garlic from your local nursery or on Amazon. I ordered some ready-to-plant softneck garlic from Amazon and they turned out great. Plus, they were super cheap.
And if you like to plant hardneck garlic instead, that’s perfectly fine too. Their only difference is that softneck garlic typically produces more cloves in a bulb. This type also tends to last longer after harvest than the hardneck garlic.
Anyways, the pot we will be using will be good for either of these variants.
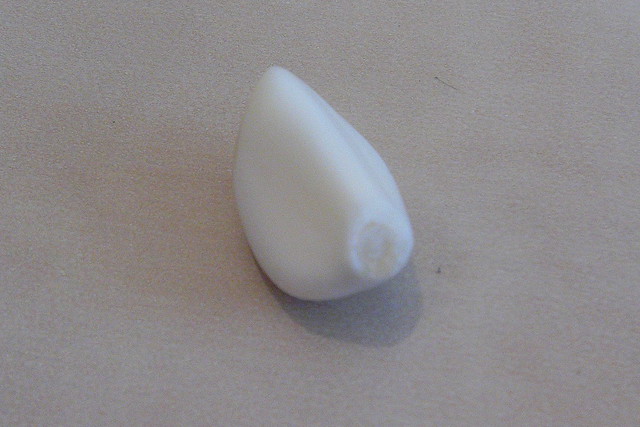
Now it’s time to pick out the cloves. On average, you can get eight to ten cloves in each bulb of garlic. In the future, this will yield eight to ten bulbs of garlic. Pick out the largest cloves for planting.
Just remember; the larger the clove, the better. They’re the ones that will grow into the bigger and healthier bulbs in the future.
What kind of pot should I use?
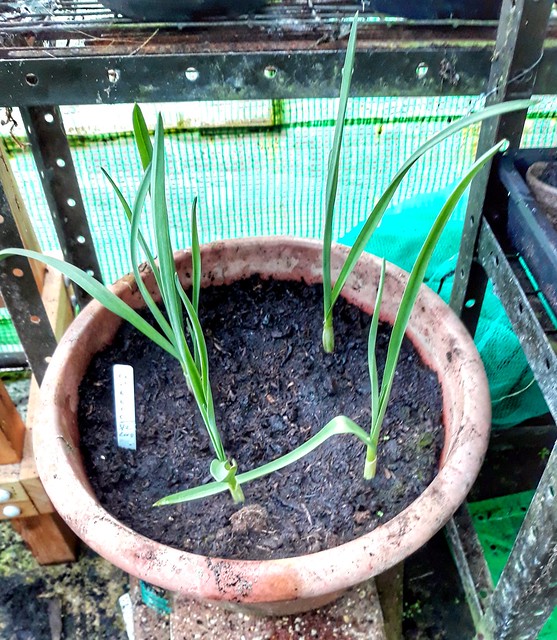
If you have a raised bed, good for you. You have a great set-up for growing those garlic plants. But if you don’t have one, no worries! Today we’re growing garlic in pots.
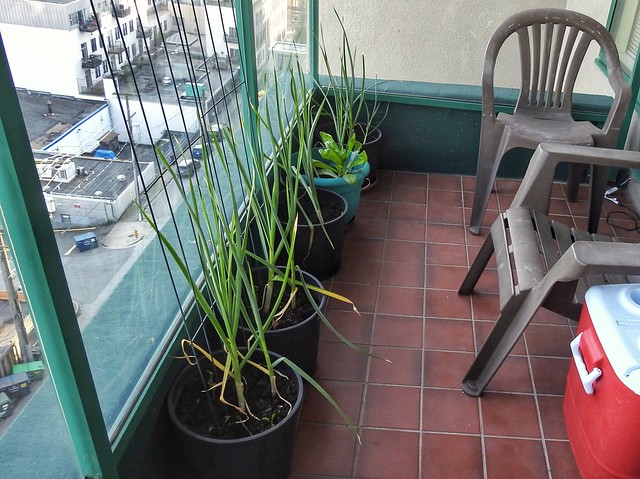
Garlic can perfectly grow in pots. For garlic plants, you need to use pots with at least 6” depth to consider the length of its roots. I’ve seen great results on planting 3 cloves to a 6″ pot. While the 8″ pot is good for planting 6 cloves and 10″ pot for 8 to 10 cloves.
Growing garlic in pots is also perfect for those who love gardening but only have limited space.
A shallow 20 cm diameter pot or grow bags are great containers for planting garlic. You can expect about 10 bulbs of garlic with this set-up.
Try asking your local nursery for one. They usually just throw it away at the end of the season, so you might score one for free. They use very durable containers so you know their pots will last for many years. (What a steal!)
Or you can always order one online if you can’t wait until then. I found these amazing grow bags from Amazon. It’s a 5-pack so more pots to plant vegetables in! These sturdy and inexpensive bags are definitely worth your investment.
How do I prepare the soil?
Now that you have your pot with you. It’s time to prepare the soil. This is a very important step to ensure large and delicious tasting bulbs of garlic.
Garlic thrives in loose and fertile soil. You’ll need well-drained soil with a pH of 6.5 to 7. Sandy Loam soil is the ideal soil for growing garlic but I’ve seen Clay soils do well for other gardeners. Though some were met with drainage problems.
There are two ways to prepare your soil.
- Fill your container with good quality soil. Loosen the soil with your hands or by using a digging fork. If the soil you have is on the thin side, I suggest using a healthy amount of well-aged mixture of compost then add organic matter like leaf mold and aged manure.
Make sure to use a 2 to 3-inch-deep layer of it. Mix and dig it in. And please do not use fresh and unprocessed animal manure. This is dangerous as it can transfer diseases.
2. The simpler way is to just fill your container with good quality multi-purpose compost. Then mix in five grams of granular fertilizer for every two and a half-liter of compost. Make five to six holes per pot and make sure they’re 2.5 to 3 inches deep.
Talk about quick and easy, right?
For high-quality potting soil, I suggest using this product I ordered on Amazon. It keeps the soil loamy and well aerated.
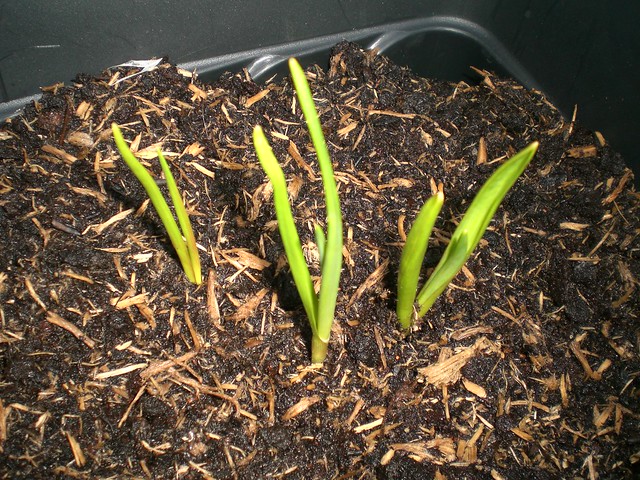
How do I plant the garlic?
Finally! We have everything we need, so it’s time for planting.
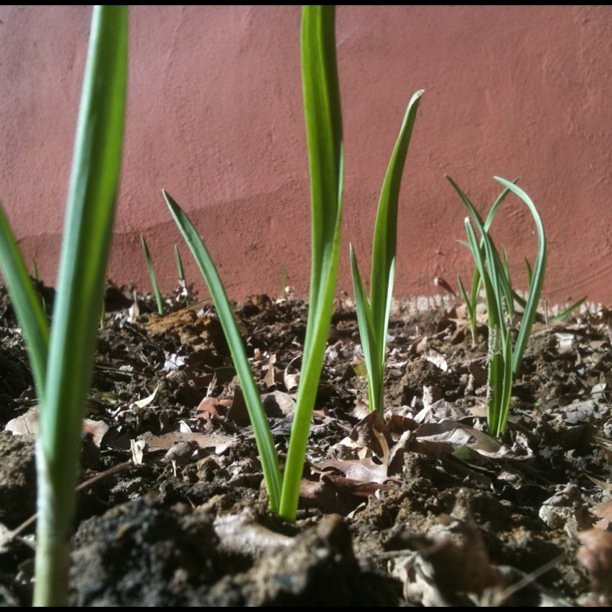
After you’ve split off individual cloves of garlic, pick the largest ones. The papery husk on each individual clove should remain intact. Wait a few days before planting.
Push them into the soil and compost mix about 2 inches deep. See to it that the pointed end is facing upright. The cloves should be 2 to 4 inches apart.
Do not plant them close to the container edge. There needs to be enough space for bulbs to swell.
After every clove is planted, smooth the soil’s surface. Finally, water them to settle the soil. Place your pot in a sunny and sheltered area outdoors.
That’s it! Pat yourself on the back. You’ve finished planting your home-grown garlic. I told you it’s gonna be easy. The next part now is caring for your plant and waiting for the harvest.
How and when do I thin my plant?
Thinning your seedlings may sound complicated for the new gardeners but there’s no need to panic. There will come a time when your plants may become too crowded. And this is where thinning enters.
Basically, thinning means the act of removing some of the plants that are growing too close to each other. This happens when seedlings are growing in a very tight group. You should thin them out to ensure there’s a proper spacing of plants in your garden.
By doing so, you ensure that each bulb will be given enough room to grow and mature. If you see your seedlings maturing with proper space between them, then there’s no need to do this step! (Nice job on planting them!)
How can I properly water my plant?
As I’ve told earlier, garlic plants are ridiculously low maintenance. So one thing you should never do is to overwater them.
Water your plant every three to five days during the bulbing period (mid-May through June). Always check for the dampness of the compost. Push your finger into your plant’s soil to check this. Occasionally water your plant, only do so when the compost begins to dry out.
When May and June become very dry, water generously for every eight to ten days. And as mid-June approaches, significantly decrease the amount of water.
Which fertilizer should I use and when do I use it?
One of the best times to use fertilizer is when you’re on your planting stage. After you fill your container with compost, mix in five grams of granular fertilizer for every two and a half-liter of compost.
I found that this granular onion fertilizer works wonders for my garlic plant. Using this help boost my plant’s growth and it creates the best bulbs!
Fertilize in early spring and again in early May, just before the bulbs start to swell due to prolonged sunlight. If you see yellowing leaves, you may fertilize again. After that, you can skip fertilizing again until spring.
How much sun does my garlic plant need?
I cannot stress this enough. Your garlic plant needs to be placed outdoors in a sunny spot. It thrives the best when it receives at least six hours of sunlight daily.
What’s the best month to grow a garlic?
To have the perfect quality of garlic, timing of planting is also key. Usually, garlic is grown during fall or early winter. But the texture of the ground, the temperature, and the environment should be considered in identifying the right time for you to plant.
But we highly encourage the fall season. With this, the crop will have a considerable amount of time to grow its roots before winter to avoid the freezing of the ground. By the time of spring season, your crop will be beaming of foliage.
If you will be planting on extremely cold weathers, you better plant two weeks after the first fall frost date.
In general, for those areas with a cooler, September to November is the prime time to plant garlic. However, for warmer areas, February and March would be perfect for some garlic gardening.
There’s no one formula to know the right time to plant garlic. You have to adjust to your weather conditions. The primary idea is to ensure that the crop will survive and thrive through winter. That’s why time and room must be given to let the crop grow its roots freely and timely.

Which climate better suits garlic?
Garlic, like other crops, could not grow on all weather conditions, especially for extreme weather conditions. It may also vary since there are other types of garlic. Especially since garlic is divided into two – softneck varieties and hardneck varieties.
Softneck Variety
One thing that softneck varieties is best known for: their long shelf life. This is probably why you’ll typically see them in the groceries. They also have layers of cloves formed around a central core and they do not produce a flower stalk.
They would actually work great on areas with mild winters. However some of the varieties could withstand extreme conditions (Zone 3 & 4) like Inchelium Red, Red Lock, New York, and White Neck.
Hardneck Variety
From the name itself, this variety of garlic is harder than the other. Moreover, it has a hard flower stalk which makes the cloves closer to each other. It is divided into three major variety types: German Extra Hardy, Chesnok Red, and Spanish Roja.

Due to its hardness quality, hardneck variety is perfect for winter conditions.
In a nutshell, garlic could thrive from Zones 3 – 9. You just have to choose the right variety that would work well for your USDA zone.
Are you ready to plant your first garlic baby? If you’re feeling anxious about the outcome, let me walk you through the growth stages of garlic.
Garlic usually takes nine months to mature. If you followed the instructions above, you probably planted in November and you’re expecting to harvest by July. Fingers crossed!
You’ve done your research on perfectly planting garlic, but garlic also needs to be taken care of even after planting. Even if growing garlic does not require extensive number of work, there are steps to take to make sure that the crop really do thrive for harvest.
- Early stages
During the first trimester, the soil should be mulched heavily with straw to prepare for the winter to come. Again with Gardening 101, we wanted to ensure that the crop grew its roots as freely as possible.
This straw mulch helps in creating a favorable environment for roots to grow. The hay keeps the soil warmer which slows the freezing of the soil before it actually grow the roots.
The overuse of straw mulch during winter season was also proven to lead to bigger crops and better yield. This is because the mulch keeps the weeds from growing not until the next season to come.
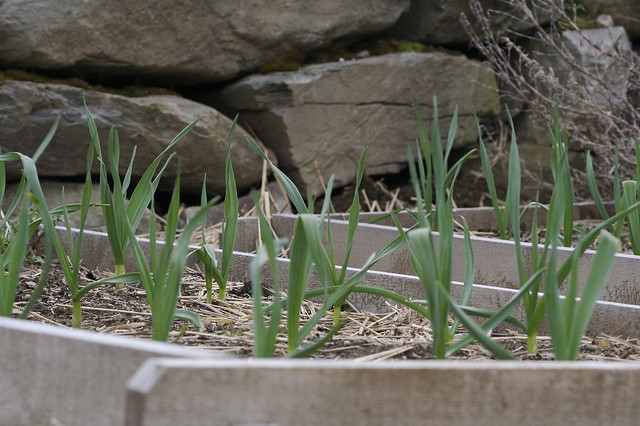
- Spring Season
After winter has arrived, insulation is no longer needed. You could now remove the mulch since young shoots would not grow in temperatures below 20°F / -6°C.
Since the temperature during this season tends to increase, you may notice shoots sprouting from the ground. Cut these immediately to prevent decrease in bulb size.
Moreover, always remember that spring is all about fertilization. Use nitrogen-heavy fertilizers like blood meal, chicken manure, and other store-bought or formulated fertilizers.
You have to fertilize in the early days of spring and fertilize again before the bulbs begin to swell which usually happens in early May. If you see discoloration on the leaves, fertilize again.
Weeding should also be practiced because garlic needs all the nutrients. It does not thrive with competition since it needs a great amount of nitrogen and other minerals.
Maintenance of the plant could be a tough job, but keeping it away from disease is an even tougher job. Good thing is that garlic does not have a lot of pests and diseases that might affect your garden.
What are the diseases you have to be cautious about?
Garlic is really one of the most low-maintenance crops. You don’t have to worry much about the diseases that might infect it.In fact, garlic is considered to be a natural insect repellent. However, there are still some diseases that you should be wary about.
White Rot
This disease is caused by fungi. It usually attacks during cool weather conditions. The infestation could be visible on leaves and roots.
There are little to none corrective actions that we could do with white rot. The most effective would be crop rotation and cleaning after harvesting. It is best to take action immediately since the spores can live in the soil for years.
Basal Rot
Early signs of this disease are yellowing and wilting of the leaves. You could also observe white powdery fungal growth at the base of the bulb. This will eventually lead to wilting of the bulb.
Spreading of this disease could be traced on the seeding process. That’s why in order to manage this disease, the seeds should be ensured to be fungus-free. Also, you should also have to clean after harvesting and check your irrigation system.
What other crops could you plant together with garlic to maximize your garden space?
Luckily for you, you don’t have to search google because we’ll reveal it now. Garlic takes a very little space in your garden. It won’t hurt if you plant another crop right beside it, as long as these two are proven to be companions in the garden.
It is a natural insect and pest repellant. That’s why you could definitely place a disease-prone crop right beside it to drive the pests away. Some of the crops you could place beside garlic are:
Due to the natural benefits of garlic, the list of companion planting could go on and on. But these are just some of the most beneficial practice that has been proven before.
But how about the crops that don’t go well with garlic?
While garlic could be named the title, “Best Planting Companion,” not all crops go well with garlic when planted.
Take for example, strawberries. Strawberries and garlic are shallow eaters. They don’t do well with competition as they always have nutrient needs to fulfill. Putting them together might be more harming than rewarding.
This is because the main function of garlic as insect repellent would not be helpful to a strawberry. Especially because the main pest of a strawberry is not an insect, but a slug. On that note, planting strawberries and garlic next to each other is not a good idea.
When to Harvest Garlic
How do you know if you’re ready to harvest? Usually the leaves of the plant started turning yellow and falling apart. But before digging up the whole garden of garlic, test first. Dig one crop and lift the bulb to see if you’re ready.
You have to be careful in pulling out the bulb to ensure that your garlic are still marketable. So instead of pulling, get a garden fork or spade and lift the plants one by one. Tap for excess soil then hang it out on the refrigerated room to ensure quality of products.
But wait, gardening does not stop from harvesting. You still have to store your crop before distributing to the right customers.
Be ready to be one of the garlic mogul by storing the garlic properly to maintain quality of products. Here are some of the final steps to remember before becoming a garlic mogul.
- Check if the bulbs are completely dry and free from dirt. You will notice if the garlic is perfect for storage if it started looking like garlic we see in grocery store – papery, dry, and dry roots.
- Store the bulbs in a 40°F / 4°C dry and dark room. Do not store it in a refrigerator or basement if moist. We wanted to preserve the dryness to increase the flavor of the garlic.
- If you want to plant garlic again for the next fall, or whichever season is most conducive for your climate, keep some of the biggest bulbs to be used as seeds on the following cycle.


